

We have had a lot of fun using our EV3 bricks for a lot of things, such as programming them to play our favorite songs and accomplishing fun tasks we make on our own, but by far the most fun part of EV3 comes when you add motors into the mix! Motors allow you to build a robot that can drive around or build a machine with moving arms or rotating turn tables. Motors are obviously especially important in EV3 for competing in FIRST LEGO League (FLL). How else can you move around the field and accomplish all those cool missions?
In this article, we will teach you about the parameters on a motor block, different types of motor blocks, and the basic types of turns.
Basic Options and Parameters
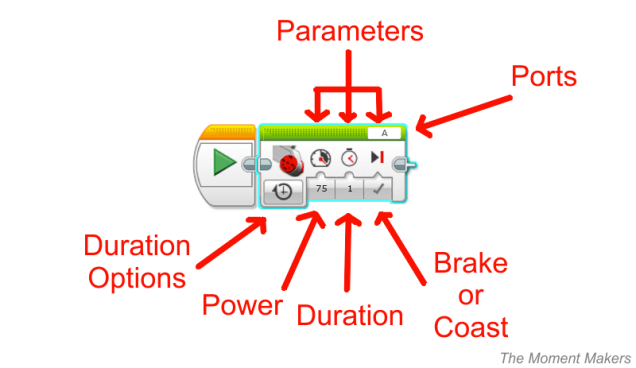
We will start by using the large motor block (all motor blocks) are found in the green tab on the bottom). All motor blocks mainly have these options.
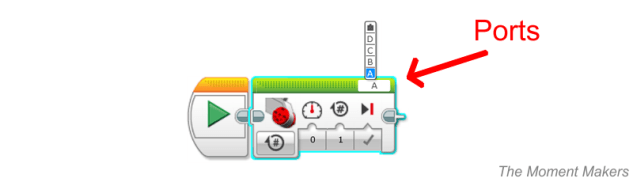
On top right of the block there is a space where you can select the port. There are five port options: A, B, C, D, and input. You can check which port your robot is using by following the wires on your robot from you motors to the letter ports.
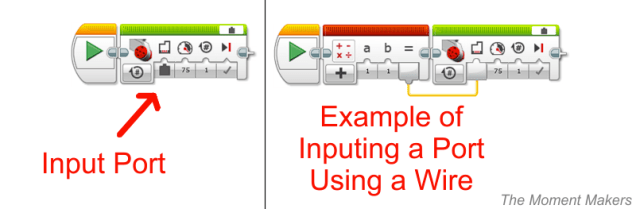
When you select the input option (it is the one that looks like a 1×1 LEGO brick or the end of a text wire) the block will change to add another parameter at the beginning. In this parameter you can plug-in a yellow math wire (the one with a rounded top) to specify which port to use, except the data you put in there must be a number (1 for A, 2 for B, 3 for C, or 4 for D) .
There are three parameter categories that are in almost all of the motor blocks: speed or power (usually parameter one), distance or time running (usually parameter two), and break or coast (usually parameter three).
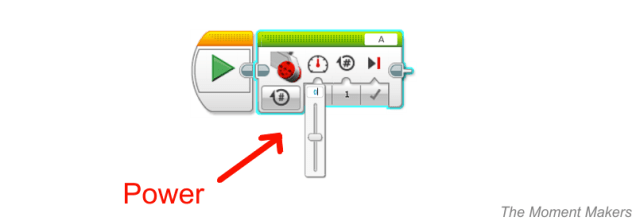
The speed or power parameter is for the percentage of power you wish for the motor to run at. Choosing positive versus negative will determine if the motor is turning forward or backward. This being said, 100 is the fastest forward power, 1 is the slowest forward power, -100 is the fastest backward power, -1 is the slowest backward power, and 0 will not move at all.

For the duration options, their are three different types: on for seconds, on for rotations, and on for degrees. We will discuss the other two options (“on” and “off”) later in the article.

For “on for seconds” a little clock will appear after the power parameter. Like it says in the name, the number you type in here will specify how many seconds the motor stays on for. You can type in decimals for fractions of a second for this option.

For “on for rotations” a number symbol encircled will appear after the power parameter. Here you type in how many complete rotations of the motor (or 360 degrees) you would like the motor to turn. You can type in decimals for fractions of a rotation for this option.

For “on for degrees” a circle will appear after the power parameter. How much the circle is filled depends on the number specified. The number you type refers to how many degrees your motor turns, 360 degrees being equal to 1 rotation. You can type in greater than 360 to have the motor move more than one rotation. This option is useful because it is more exact than “on for rotations.”
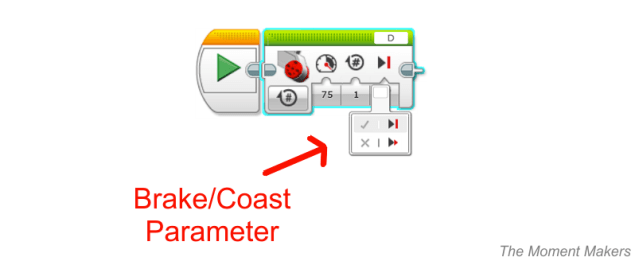
The brake and coast options on a motor block are actually a little more complicated than they sound. A basic way of looking at it can be that “brake” will cause the motor to quickly stop and lock in that position (it cannot be moved by hand until the motor is unlocked by playing another motor block for that port or until the program ends). In the same way, the basic way of looking at “coast” is that it will just shut off the power to that motor but will not force a stop or locking of the motor.
The more complicated explanation has to do with the servo control circuit. All motor movements with a duration (time, degrees, rotations, etc.) will stop rotating the motors when the duration condition is met. The “brake” setting leaves on the motor’s controller circuit. The “coast” setting turns off the motor’s controller circuit. The “brake” setting can make motors stop so fast because it actually puts the motor in reverse to bring the power level to zero. If you were to put a wait block after a “braked” motor block, you would find that if you tried to move the motor it would not move. This is because the motor’s controller circuit is countering what you do when you try to move the motor. If you try this test with a “coast”, you will find that you can move the motor just fine. This is because the motor’s controller circuit is off.

For the “on” option the last parameters will disappear, leaving only the power parameter(s). The “on” option will basically go on forever at a given power until stopped by another block in your program.

For the “off” option the first parameters will disappear, leaving only the last parameter for braking or coasting. The “off” option is basically a break and it undoes the “on” option.
Different Motor Blocks

The first type of motor block is the one we have already shown you, the large motor block. This block works for one of the EV3 large motors.

The second type of motor block is the medium motor block. This block is the same as the large motor block except for the fact that moves only one of the EV3 medium motors.
The last two types of motor blocks are called steering blocks. They can control two EV3 large motors at the same time. These blocks are mostly used for driving robots. These blocks have an added port and parameter.
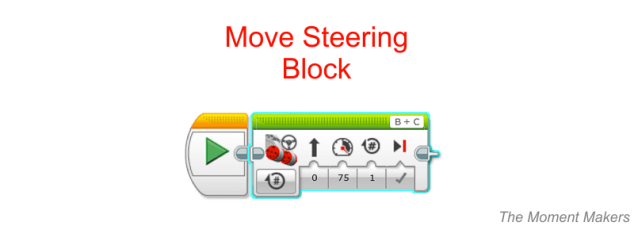
The first of these motor blocks is the move steering block. This block is useful for teams who are new to the EV3 programming. For the ports on the top right, make sure that your left motor’s port is listed first (on the left) and your right motor’s port is listed second (on the right).

The added parameter for this block is the steering parameter. The steering parameter adjusts the powers for the two motors to make different turns or to go straight . As you move the slider to the left and to the right, the formerly straight arrow can keep bending until, at the maximum, it forms a circle (the numbers range from -100 to 100, 0 meaning straight).
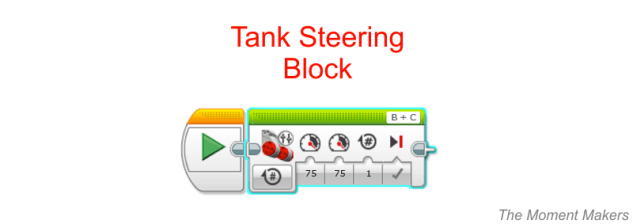
The other steering block is the tank steering block. The port set-up for this block is the same as the move steering block, however this block has an added power parameter. The port on the left’s power can be changed by the power parameter on the left and the port on the right’s power can be changed by the power parameter on the right. This block is extremely useful for making very exact turns.
Main Types of Turns
The last thing we would like to tell you in this article is about the main types of turns. If you want to test these, it is easiest to understand them with a tank steering block.
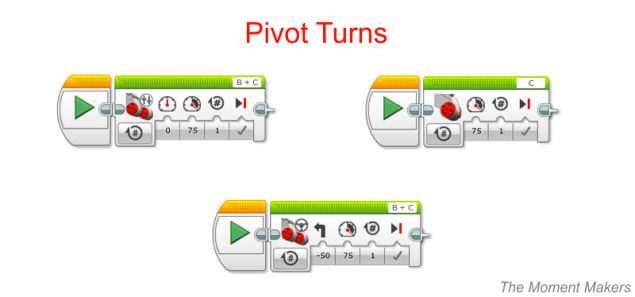
The first type is the pivot turn. A pivot turn is a turn where one wheel is moving and the other stays in place. You can accomplish this by setting one of the power parameters on the tank steering block to 0 and the other moving forward or backward. Another way is to use a large motor block at your moving power. Also, you can use a move steering block and change the steering parameter to a right angle (50 or -50).
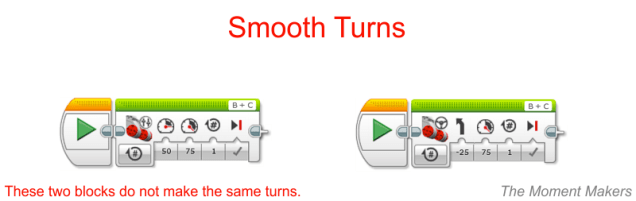
The next type is a smooth turn. A smooth turn is a turn in which both wheels are moving is the same direction, but at different powers. This can be accomplished with both the move steering and tank steering blocks.
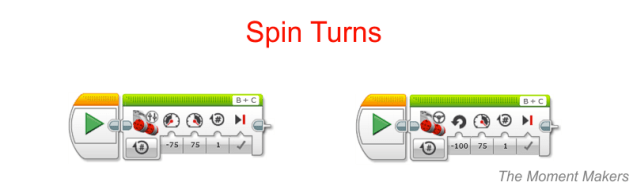
The last type is a spin turn. A spin turn is a turn where both wheels are moving in opposite directions at the same power. This makes your robot spin in circles around a central point. For the tank steering block, if your power is 75, one power parameter should read 75 and the other should read -75. For the move steering block you must change the steering parameter to the circle (100 or -100).
That is it for this article. We hope you learned a lot!

One thought on “EV3 Programming: Motor Blocks”
Comments are closed.