

Today we are going to talk about “MyBlocks.” MyBlocks allow you to create your own programming blocks (AKA subroutines or functions) made up of any combination of EV3 blocks already available! How cool is that? As you program your EV3, MyBlocks can be very helpful and can help take your code to the next level!
Why MyBlocks Are Used
The main reason we use MyBlocks is to streamline code. In some programming languages, they are called “subroutines” or user-defined “functions.” If something is repeated over and over again, we usually think we can use loops. Though in some cases, we don’t want to repeat the action over and over again in a row; we want other actions interspersed with it. This makes loops unusable. Also, if there is a series of steps that you want to be able to call in multiple programs, you don’t want to keep having to rewrite it or copy-and-paste it each time you use it. This is where MyBlocks are useful! MyBlocks also have the advantage of taking inputs (called parameters) that can help specialize how each MyBlock performs.
Making MyBlocks
When making your MyBlock, you can first code and test the code in the EV3 software program window. When you have the code the way you want it, you can select the various program blocks, leaving off selecting the green triangle “play” button block. Then, in the menu bar of the EV3 software, click on the “Tools” list and select “My Block Builder.”

The EV3 software will pull up a pop-up box. Click an icon at the bottom of the pop-up box that you want to be the icon for your MyBlock.

For the icon, we suggest that you choose something related to your MyBlock’s function. For example, if we made a MyBlock that uses a touch sensor, we would choose the touch sensor icon.
Then type the name of your MyBlock in the “My Block Name” text area. Again, name it something related to your MyBlock’s function. There is also a place to put a description. This is not necessary because it never shows up outside of the “My Block Builder” window.
You may see that on the block preview at the top of the window that there is a “+” icon. You can click this to add up to ten parameters. Parameters are values you either want to input to the MyBlock or output from the MyBlock to the rest of your code. An example parameter could be an input of the port number of the motor to be controlled. Deleting a parameter is just as simple. Select the parameter you want to delete and click the “x” on the top right corner of the blue highlighter rectangle. You can also move parameters to reorder them in the list. To do this, click the one you want to move. Then, click one of the arrows on the bottom of the blue highlighter rectangle depending on which way you want it to move.
This is an example MyBlock with two input parameters and a slider. We have instructions at the end of the article of how to make this example MyBlock.
You can specialize parameters a lot, for all different kinds of MyBlocks! In the “Parameter Setup” tab you can many different things. First, you can name the parameter. The name will show up when your mouse hovers over it later.
Second, you can change whether it is an input or output parameter.
Third, you can change the data type. Different parameter data types are the following: number, logic (true/false), text, numeric array (an organized list of numbers), and logic array (an organized list of true [1] and false [0]).
Fourth, you can set the default value. Set this to something you most often use, to save time programming.
Fifth, if your data type is a number and is an input, you can choose to have a vertical or horizontal slider. Sliders allow you to choose the minimum and maximum values for the parameter, which can come in handy even if you don’t really need the slider.
In the “Parameter Icons” tab you can choose from a lot of different icons. Similarly to the “My Block Icons” tab, the “Parameter Icons” tab lets you choose an icon for your parameter. Choose something related to the your parameter, itself, to help you remember which is which before you even mouse-over for the description.
You can repeat these steps for your other parameters. Below in our example MyBlock walkthrough, we have pictures on how this is done.
Changing MyBlocks
There are two different ways you can change MyBlocks:
- Double-clicking a MyBlock will take you to the original program you made. If you change or move any blocks, wires, or comments, what you just changed will be changed everywhere that MyBlock is used.
- Clicking the gear button on your MyBlock will open back up the “My Block Builder” window. You can change anything in there, such as names, icons, etc.. Though keep in mind that changing anything will set all of your current placed MyBlocks’ parameters to their default values.
Example MyBlock
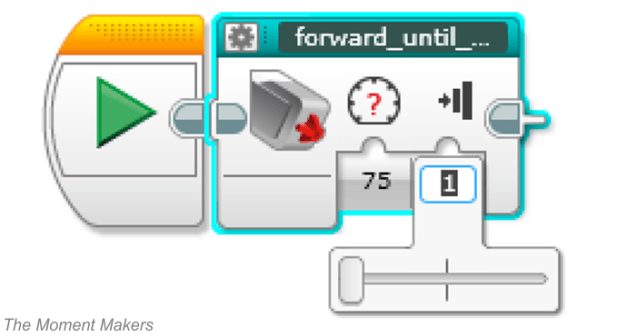
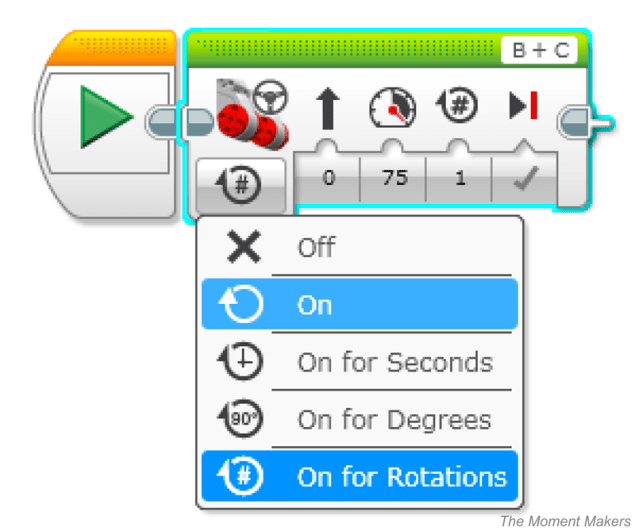
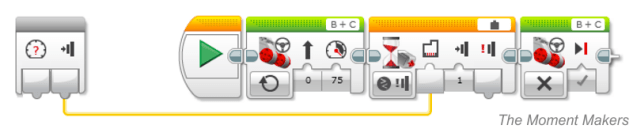
Let’s look at making an example MyBlock! For our example, let’s first make code to have our robot drive straight forward until the touch sensor is pressed. To start off we are going to make a new program that will only do that function. First drag a “move steering” block onto the canvas. Instead of “On for Rotations” set it to “On.”
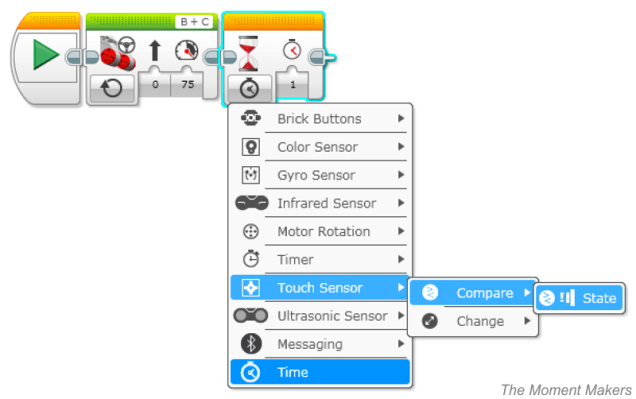
Next pull out a wait block. Set it to “Touch Sensor, Compare, State.”
Lastly for this program, pull out another move steering block. Set it to “Off.”
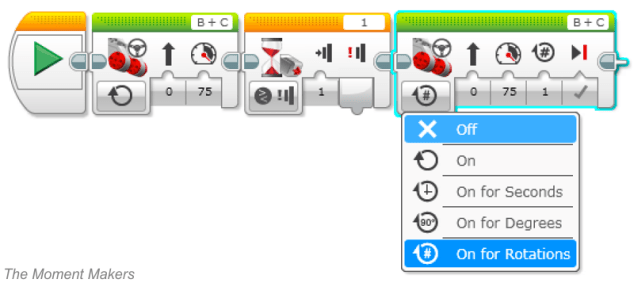
Your code should look like this:

We have just made a program that will have the robot go forward until it hits something! Now let’s make it into a MyBlock! Select everything you just put in except the orange start block with the green arrow, and then move your mouse to the top of the screen. Hover on “Tools” and select “My Block Builder.”
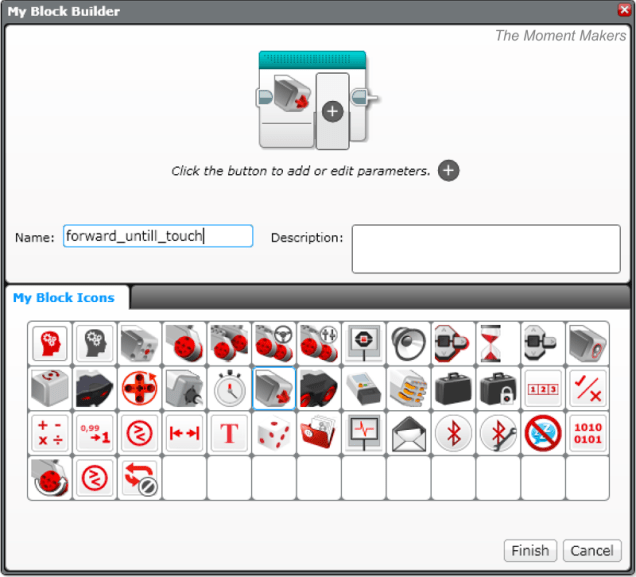
That should open up this screen:
Let’s name this MyBlock “forward_until_touch.” Also, select the touch sensor icon for the MyBlock.
Now click the “Finish” button. You made a MyBlock! You can use your MyBlock at any point in your code. You can drag it out of the teal tab at the bottom of the screen.

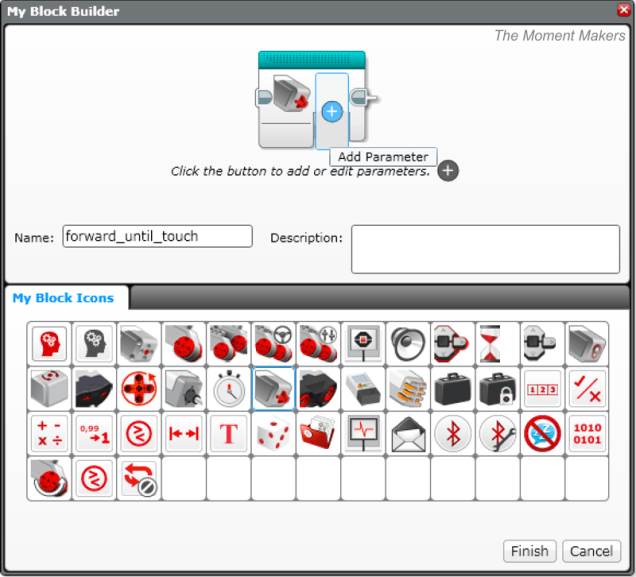
This MyBlock is pretty awesome, but what if you want to go backwards until another touch sensor bumps into something as well? We don’t have to make another MyBlock. We can make parameters to specify the port that the touch sensor is plugged into, as well as the power (speed) that the robot is traveling at.
Click the gear icon on the top-left corner of the MyBlock. That should open up the same My Block Builder window again. The first thing we are going to do is click the “+” or “Add Parameter” button.
Once it has been clicked, your screen should look like the picture below. In “Parameter Setup” name the parameter “power (speed).” When your mouse hovers over the parameter later, it will display the parameter name.
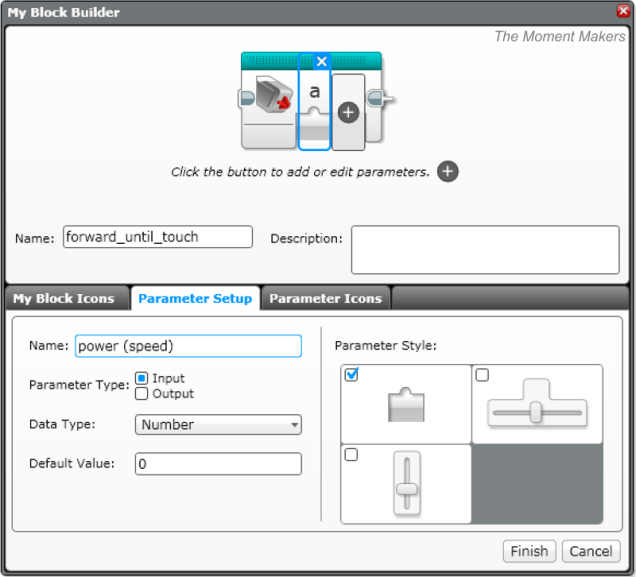
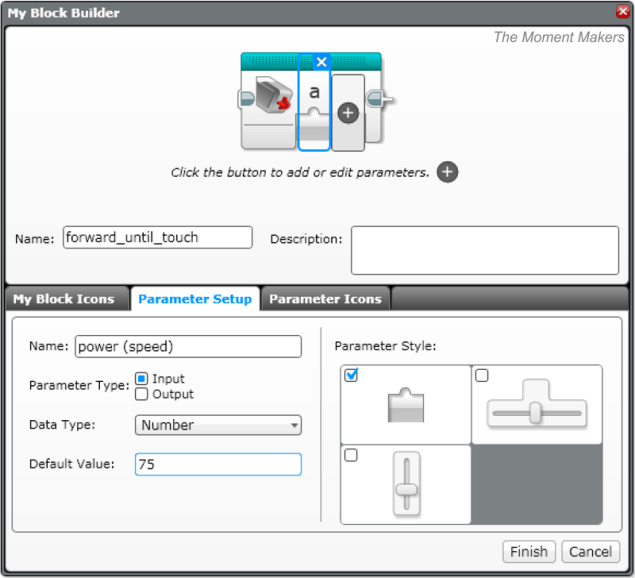
Since the “Parameter Type” and “Data Type” are what we already need, we can leave those alone. Set the “Default Value” to whatever speed you would use most with this MyBlock. In our demonstration, we will have the default be 75%.
Next, we are going to select the “Vertical Slider” in “Parameter Style.” The reason we do this is so we can have minimum and maximum limits. Also, it is nice that it is more similar to regular motor blocks.

Leave the minimum at -100 and the maximum at 100.

We are almost done with the power parameter, but first we have to change the parameter icon to something related to what the parameter specifies (power/speed). Go into the “Parameter Icons” tab. It should look like this:
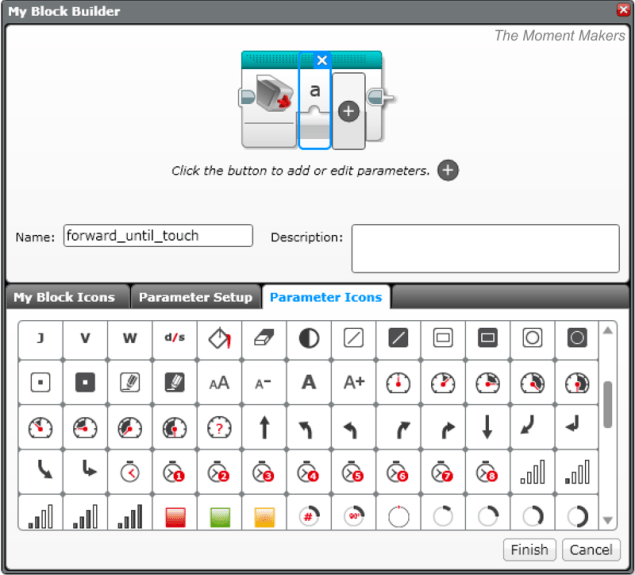
Scroll down a little bit and select the speed gauge with the “?” in the middle (this is an icon we like to associate with an unknown speed, but you could use any that you like).

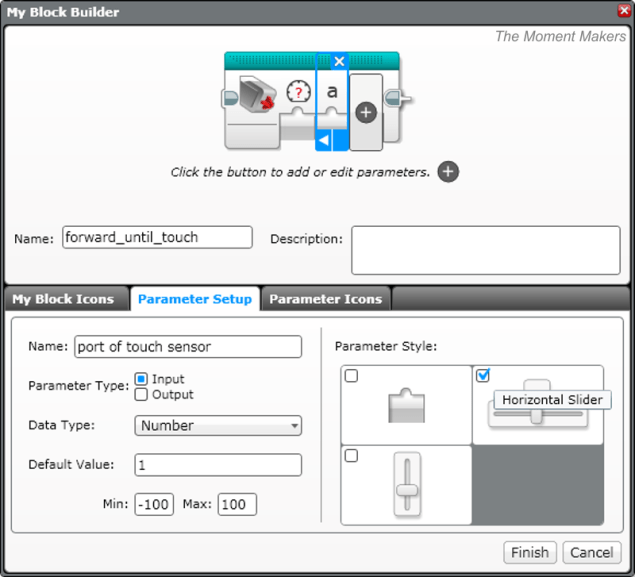
We finished that parameter, but we are not done yet! We still have to create a parameter to specify what port we are using for the touch sensor. Click the plus button again and name the parameter “port of touch sensor” in “Parameter Setup.”

The “Parameter Type” and “Data Type” are still just the way we want them. Again, you can leave those alone. Set the “Default Value” to whatever sensor you use most. In our example, we will set it to 1.

Now, we are going to select “Horizontal Slider” in “Parameter Style” because we want minimum and maximum limits. We do not want the MyBlock to allow someone to type in a 5 or a -1 (ports that don’t exist) because it will trip up the program.
We will set the minimum to 1 and the maximum to 4.
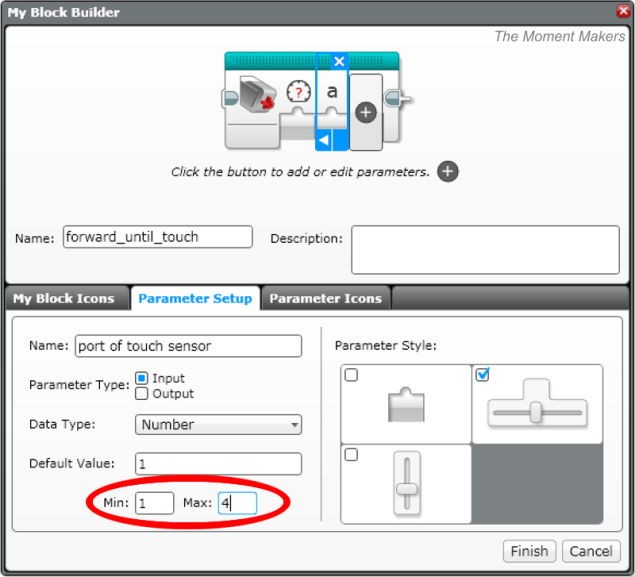
We are done setting up the parameter, but we still have to choose a more relevant icon than “a.” Go back into the “Parameter Icons” tab and select the touch sensor pressed icon.

Click the finish button. This is your MyBlock!

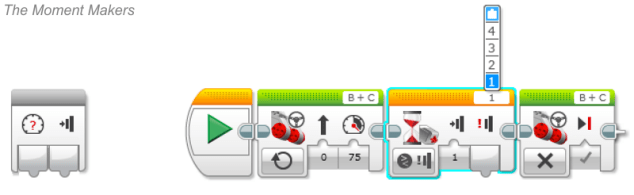
This is what the sliders look like.
Your MyBlock is super awesome, but the parameters don’t work, yet! No matter what values you put in the parameters, the MyBlock performs the same way it did before! The parameters are not plugged in yet and cannot be used! Double click on your MyBlock to get the parameters controlling the functions they were meant to. This is what it should look like:

Our parameters’ parameter-outputs on the side haven’t been plugged in, yet! First, we need to make the touch sensor’s port something that we can input a value into. Select the port changing button on the top right of the wait block. Change that to the option at the top (the input option).
This will change the look of the wait block to allow a parameter. Plug the sensor output we made into the input that just created.
Lastly, plug in the speed output into the appropriate location on the first motor block.

Now, you can test your MyBlock with different configurations! Also, you can call this MyBlock as many times as you want in the current project. You can export your MyBlock through the “project properties” screen and then import it into other projects to use it there.
Thank you so much for reading our article! We hope it helped you!

You must be logged in to post a comment.