

Switch blocks in EV3 programming specify what you want the programming to do for two or more different conditions: “if EV3 detects this do this or if EV3 detects that do something else”. In other kinds of programming, you will often see this called “If…then…else” with maybe even “else…if.” In this article we will show you the many different options the EV3 software gives you.
Since the switch block has so many different options we decided to split talking about switch blocks into 2 articles. This one will be about every option besides the sensor options. We are currently working on an article about the different sensor options.
The Logic Option
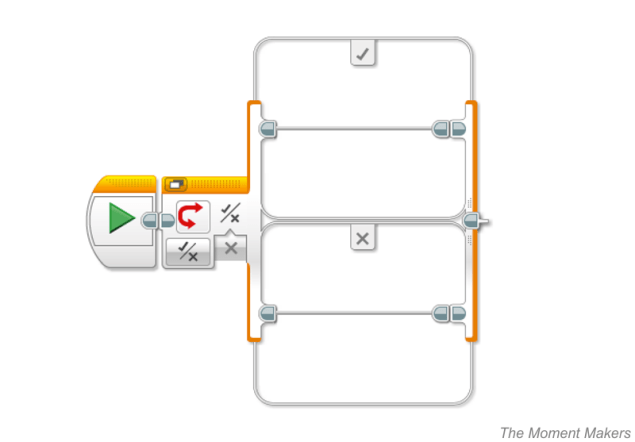
In the “Logic” option, you see the true/false symbol above a logic input. Next to that, there are 2 boxes that you can insert EV3 programming blocks into. In the top box, there is the check mark as a “true” symbol. In the bottom box, there is an x as the “false” symbol. This means that, if the input condition is true, the commands on the top box are carried out, and if the input condition is false, the commands on the bottom box are carried out.
Note that in order for this switch block to be useful, a logic wire would need to be connected to the input. The logic wire introduces a test that your program can determine as either true or false and complete the following steps appropriately. If you only click to pre-select true or false, there is no real meaning for this block.
As a test to check if 2 variables are not equal to each other, you could plug those 2 variables into a compare block. Then you could plug the compare block’s output into the switch block’s input.

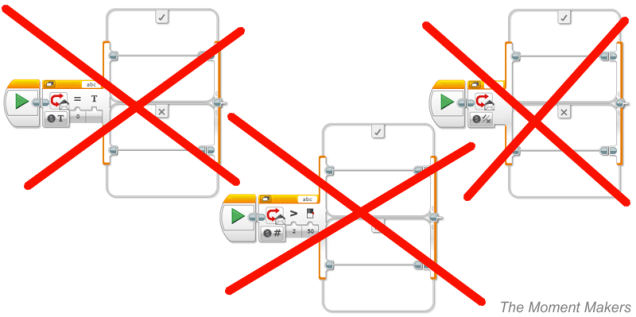
The Numeric and Text Options

In the “Numeric” option, you see a # symbol above a numeric input. In the “Text” option, you see a “T” symbol above a text input. Both are sort of like the “Logic” option, but in the “Numeric” and “Text” options you can have as many conditions as you want! You can add cases by clicking the “+” button. You can change the numbers/text (depending which option you chose) in the cases as well, but remember that you can only put numbers inside when you selected the “Numeric” option, and you can put text or numbers inside when you selected the “Text” option. You can rename cases by typing the letter or number you wish into the box.
Remember that if you have a case that physically cannot be a condition, then you might want to rename the case or delete it. You can delete cases by clicking the “x” button next to the case name (minimum number of cases: 2). Make sure that no two cases don’t have the same name; you want all names to be unique.
You have to plug in a wire, otherwise this block is pointless because what you type in will always be the same. When you plug in a wire the output can be multiple different things. You are using your numeric/text wire as input to actually test a condition with your programming.
The Brick Buttons Option

In this option there are 2 sub-options: measure and compare. The measure option looks for if there is a case that matches the button that has been pressed. You can have cases for as many specific buttons as you want to define. If there is not a case for the button pressed, then the block will carry out the code in the case with the black circle next to it. You can change which case has the circle by clicking where the circle would be. You can change the button for each case by clicking button layout picture on the switch block. It will then reveal a drop down menu that has different icons for the different buttons. The icons for the different buttons show the layout of the buttons on the brick, and the button in red is the button selected. In this option you can also add as many cases as the number of buttons on the brick plus no button being pressed at all. This option doesn’t have any inputs, unlike the other options. You might want to put this block in a loop or after a wait block so that it will not skip over the block entirely because you didn’t press a button while it was searching.
The compare option has 2 inputs. The first is a numeric/numeric-array input that has a drop down menu of the different icons for the buttons. The second is a numeric input that has a drop down menu that has icons for released, pressed, and bumped. The cases are labeled true and false. The way this option works is it looks to see if any one of the buttons you selected specified is pushed. You might want to put this block in a loop so that it will keep on checking if one of the buttons is pushed until you get the result you wish.
The Timer Option
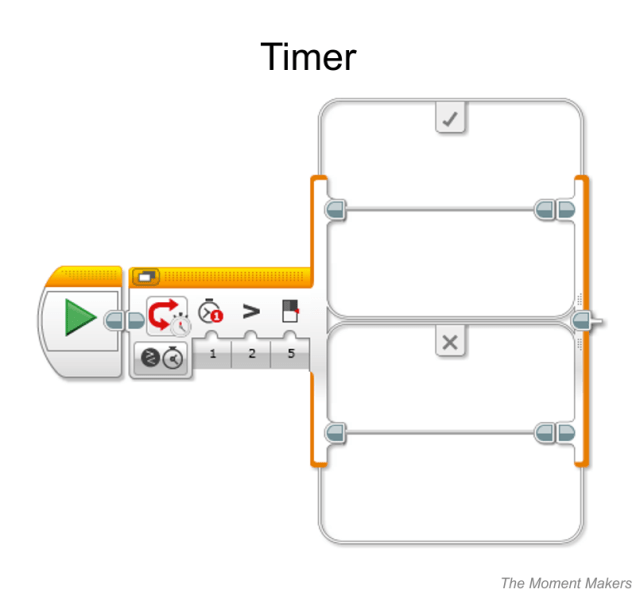
The “Timer” option has three inputs. In the first, you can specify which timer you want to use (an EV3 brick has 8 timers). Each timer resets at the being of the program, but you might want to reset one later in the program with a timer reset block. The second option defines the compare option, such as equal to, less than, and greater than or equal to. The third option defines the threshold value. You can also see 2 cases, one with the true symbol and one with the false symbol. When running, the block first uses the timer you selected in the first input. Then it compares the threshold value you specified in the third input with the time the timer you selected in the first input sees at the moment. If the compare option you chose in the second input matches the way you compared in the step before, then the block would choose the true case. If not, then the block would choose the false case.
The Motor Rotation Option
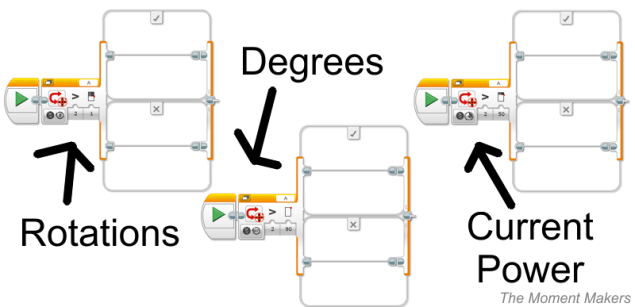
The “Motor Rotation” option has 3 options: rotations, degrees, and current power. All the options have a compare input, a threshold input, a port input, and 2 cases, one true and one false. However, the blocks are used for different reasons. The first input clarifies the compare type. The second input defines the threshold value. The port input defines which motor to use.
The rotations option compares the rotation count on the motor you selected in the port input with the threshold value you selected in the second input. If the compare option you chose in the first input matches the way you compared in the step before, then the block would choose the true case. If not, then the block would choose the false case. The degrees option is the same except instead of rotations it compares degrees, and this is the same with the current power, except instead of rotations it compares the current power of the motor.
The Messaging Option
The “Messaging” option uses Bluetooth which is not allowed in FLL. Feel free to use this outside of FLL, but we won’t talk about this because our website’s focus is to help other FLL teams.
Other Information
As we conclude this article we want to share with you some more information about switch blocks.
Switch blocks have 2 view types, flat view and tabbed view (flat view is the default). In flat view you cannot put wires into blocks inside of the cases. We use tabbed view instead for that reason. Tabbed view also takes up less space, but you can only see one case at a time.
We hope you enjoy our article! Come back next week to learn more about switch blocks and sensors.

One thought on “EV3 Programming: Switch Blocks Part 1”
Comments are closed.