

While we were creating our project prototype out of LEGOs, we found awesome aftermarket equipment from a company called Mindsensors that allows an EV3 to be able to talk to a Power Functions IR Receiver, enabling an EV3 to control LEGO Power Functions! Power Functions is a sub-section of LEGO that is mostly used in older motorized LEGO Technic sets, LEGO train sets, and the original WeDo. LEGO Power Functions included motors of different sizes, as well as lights. The Mindsensors’ PFMate controller can hook up to an EV3 with just a regular EV3 wire! Mindsensors also has a downloadable EV3 block already available! These Mindsensors after-market components are not made by LEGO, though, so they cannot be used as part of the FIRST LEGO League robot game (actually, even the Power Functions elements are excluded from the robot game). However, they might help you with developing a project prototype (how we discovered them) or you may just want to use them for fun with your EV3! In this article, we will show you how this interesting after-market component is used.
Setting up Mindsensors’ PFMate Controller
Mindsensors’ PFMate controller is very small compared to most EV3 sensors. It’s only about two plates high besides where the wire plugs into.

Get just a regular EV3 wire and plug it into your PFMate controller and an EV3 sensor port. Mindsensors designed the PFMate controller to sit directly on the Power Functions IR Receiver using two 2×1 bricks of any color. We tried to mount it further away, but we only got it to work up to about 4 inches away from the IR receiver.

How To Program Mindsensors’ PFMate Controller
After you have downloaded the EV3 block, either open a new project or open one of mindsensors’ sample programs. The new block should be in the green “Action” tab. Looking at the complex EV3 block you might not know what to do. Never fear! We had no clue either, at first. The first parameter is fine just the way it is. It is for i2c, but it is already at the preferred setting and you shouldn’t need to change it.

The second parameter is for which motors you want to control (A (red), B (blue), or AB (red and blue)).

The red and blue refers to the red and blue coloring of the two connection spots on the official LEGO Power Functions IR Receiver. You might just want to use the AB setting to make sure things don’t get confusing because, when you choose either A or B, they both show up anyway.

The third parameter is for which channel. There are four channels (1, 2, 3, and 4) for IR in the LEGO Power Functions.
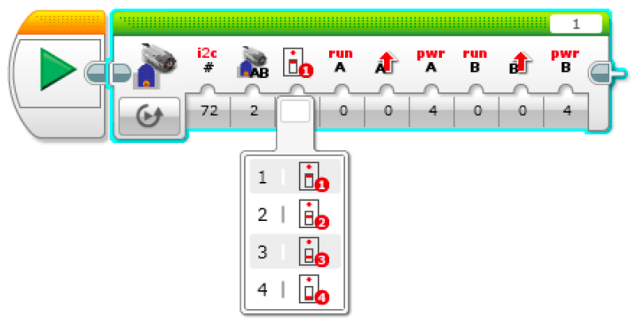
Make sure that if you have multiple Power Functions IR Receivers that you have a different channel number for each one to avoid confusion in what you are controlling and in what way. You can change the number on the Power Functions IR Receiver by moving up and down the orange switch (below).

The fourth parameter is for what to do with the red outlet (A). You can run, float, or stop. We suggest that you use only run and stop to avoid confusion. If you “run” a motor it will keep going until you “stop” it.
The fifth parameter is for what direction the red outlet (A) is going. Make sure that if your contraption only works one direction, that you choose the right one. You might have to test this to find out.
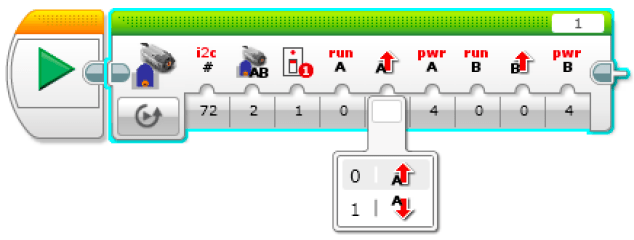
The sixth parameter is for what power you want the red outlet (A) to go at. Choose powers one through seven depending on how fast you want your motor to go. If you are using lights instead, choose powers one through seven depending on how bright you want your lights to be.

The seventh parameter is just like the fourth parameter (run, float, or stop), but it’s for the blue outlet (B). Likewise, the eighth parameter is just like the fifth parameter (direction of power), but it’s for the blue outlet (B). Again, the ninth parameter is just like the sixth parameter (power level 1 through 7), but it’s for the blue outlet (B).
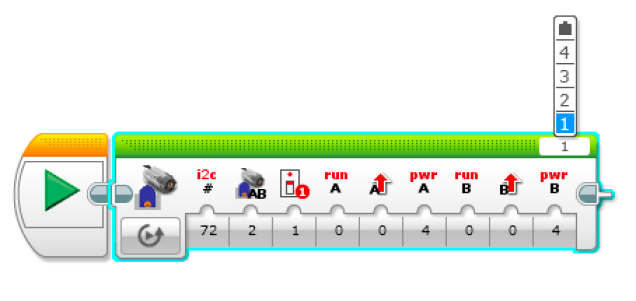
Make sure that the port number on the top right of the block matches the EV3 port number you plugged your mindsensors’ PFMate controller into.
Troubleshooting
If the program you made doesn’t work, try some of these fixes.
- Check if the channel on your program matches the channel on your Power Functions IR Receiver.
- Make sure the green light on the Power Functions IR Receiver is on. If a Power Functions AAA Battery Box is plugged in your Power Functions IR Receiver, press the green button to turn it on. If it won’t turn on, it might be out of batteries. If a Power Functions AAA Battery Box is not plugged in your Power Functions IR Receiver, plug one in now. The Power Functions IR Receiver can’t work without a power source.
- Make sure the sensor number on your program matches what port you plugged your mindsensors’ PFMate controller into.
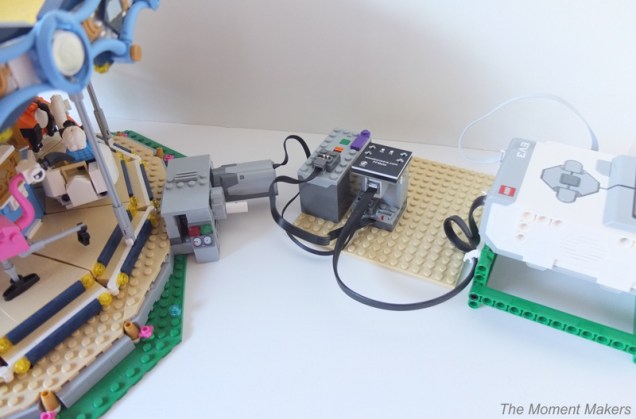
- If you are still having trouble, we suggest that you mount your PFMate controller right on top of the Power Functions IR Receiver like shown in the picture. They may have trouble connecting because the PFMate controller’s signal isn’t very powerful.
Why Would People Use This?
Maybe you are asking, “Why would I want to control LEGO Power Functions with my EV3?” Maybe you would like your motorized LEGO Technic set to drive a certain way on its own in a pre-programmed way. If you can find a way to rig a mount for the EV3 brick, that is possible with this component. Maybe you would like to motorize your LEGO carousel to run for a certain period of time, pause to let passengers load and unload, and then run again. You could easily fit the EV3 brick beside the model. The EV3 is pretty powerful and has some neat sensors (distance, color, gyro, etc., plus others available on the after-market, too). You can use your EV3 to respond to input from sensors to trigger running Power Functions in a certain way (lights going on, motors making a carousel operate, etc.). Your EV3 program can even combine this with music, if you take the time to program a sound.
Things To Keep In Mind
You can have many motors or lights on the same red or blue outlet on the Power Functions IR Receiver, but the more motors you have might not be as powerful. Remember though, that they will turn on and off together and they will also run at the same power.
Although you may want to mount your PFMate controller far away from the Power Functions IR Receiver, the PFMate controller’s signal isn’t very powerful. We suggest that you mount your PFMate controller right on top of the Power Functions IR Receiver like shown in the picture, if you are having trouble connecting.
Remember that only certified LEGO pieces are allowed in the FLL Robot Game! Though this is fun to play with (as a hobby, to learn, etc.) Power Functions and aftermarket equipment is not allowed in FLL Robot Game.
We can hardly wait to hook-up our EV3 to a train! What other cool things can you do with mindsensors’ PFMate controller?
We hope you enjoyed our article! Happy Thanksgiving!

One thought on “Have Fun With Your EV3 and Power Functions”
Comments are closed.